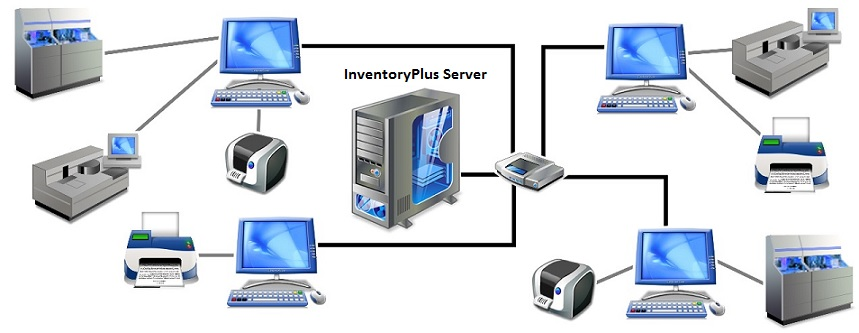
Network Configuration
Multiple user/On-line/Multiple terminal installation instruction.
InventtoryPlus can be used as off-line and also on-line solution. Off-line installation is regular installation,more details about off-line refer the Installation topic. On-line/multiuser installation is very simple, system should be installed on dedicated server/shared server. Install Inventoryplus all on system included server and clients. .
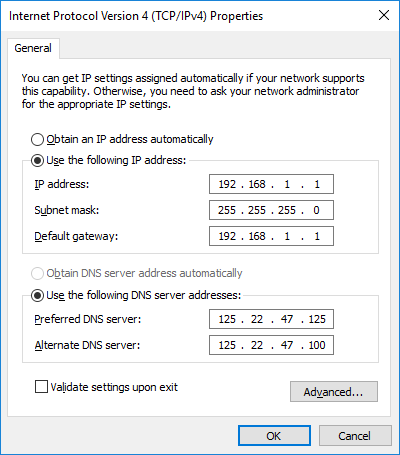
Server Static IP Configuration
- Required to change the server ip address to Static IP.
- Click Change adapter settings. Right-click on Local Area Connection and click on Properties. Select Internet Protocol Version 4 (TCP/IPv4) and click on Properties. Select "Use the following IP address" and enter the IP address (Ex. 192.168.1.1), Subnet Mask, Default Gateway. and DNS server. Below screen is for reference only, Use any IP address or use the IP and other setting recommended by router.
Proxy Configuration on Server.
- Goto window Control panel
- Goto Windows Defender Firewall
- Click on "Allow an app or feature through Windows Defender Firewall" link
- Click on Change Settings
- Click on "Add another app" button
- Click on Browse button and select the InventoryPlus.exe file located at installation location "C:\Program Files (x86)\InventoryPlus"
- Click on "Network Types.." button and select the Public option.
- Click on Add button to Save the Settings.
- Additional to above settings, Add 9090 port to outbound and inbound of proxy settings.
InventoryPlus Installation and configuration steps to follow.
- Install InventoryPlus on server system - Run the setup file on server system to install the software.
- Install InventoryPlus on client system - Run the setup file on client system to install the software.
- Create the new company on server system, when creating the new company .ims file will be created on data folder found at InventoryPlus installation location. While installing software shared folder will be created with "InventoryPlusData".
- After creating the company on server, Goto settings -> Company Details, update the static IP address in IP field as configured above (This configuration is mandatory if you want to connect client to server PC.). If you are not yet configured the Static IP address then just use the computer name in IP address field.
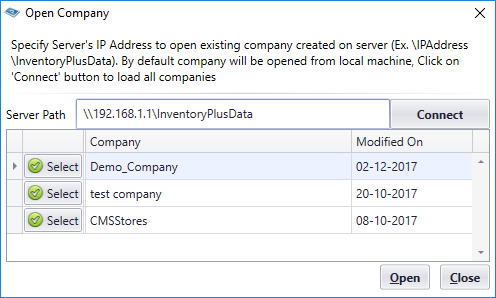
- Run the InventoryPlus software on client system. Click on "Open from server" from menu. Enter server IP address with shared folder path ( Ex. \\192.168.1.1\InventoryPlusData).
- Click on Connect button will display all company created on server.
- Click on Select button and Click on Open button to open the company created on server.
Note:
- Software upgrade on network is manual installation of setup file on all systems including server and all clients.
- All client system will connect to server using IP address/Server Host name, make sure use the static IP address on server system.
- InventoryPlus subscription activation required Server's IP and Port. If server IP is changed then required to change the Server IP address, Goto settings -> Company Data -> IP Address
- InventoryPlus should run always on server and open the activated company so all clients connected to server will be auto activated. No need to register the clients. Only server company activation is required.
- After opening the company from clients, Goto settings -> Company Data -> Select "Set as Startup Company" and click on Save, This will open the selected company when inventoryPlus starts always
FAQ
1. How to get the server IP address?
Answer : Get the server IP address is simple. Run the software on server, Load "Open from server" will display the pop-up with open company window with server path. Server path contains IP address, use the same IP address on all client system to connect. (usually IP Address start with 192.xxx.xxx.xxx).