Sales entry
What is a Sales Bill?
When a sales transaction takes place, a document, detailing the transaction (item name, tax, etc) has to be given to the buyer (debtor) as proof of purchase by him. This document is called "Invoice" or "Bill" or "Cash Memo". The practice of issuing an Invoice is available in InventoryPlus.
Go to Home and Sales (CTRL + ALT +S) tool bar button will open the sales entry screen. Used to enter the Sales/Sales Return Bill. Entering ‘Sales’ invoice enter item name on text box and hit enter will add the item. Select the sales return entry click on "Details" button found on bottom of the page and select the "Sales Return" button.
In this screen allows to enter all Sales related details like Customer, Bill no, Date, Item quantity sold Etc.,
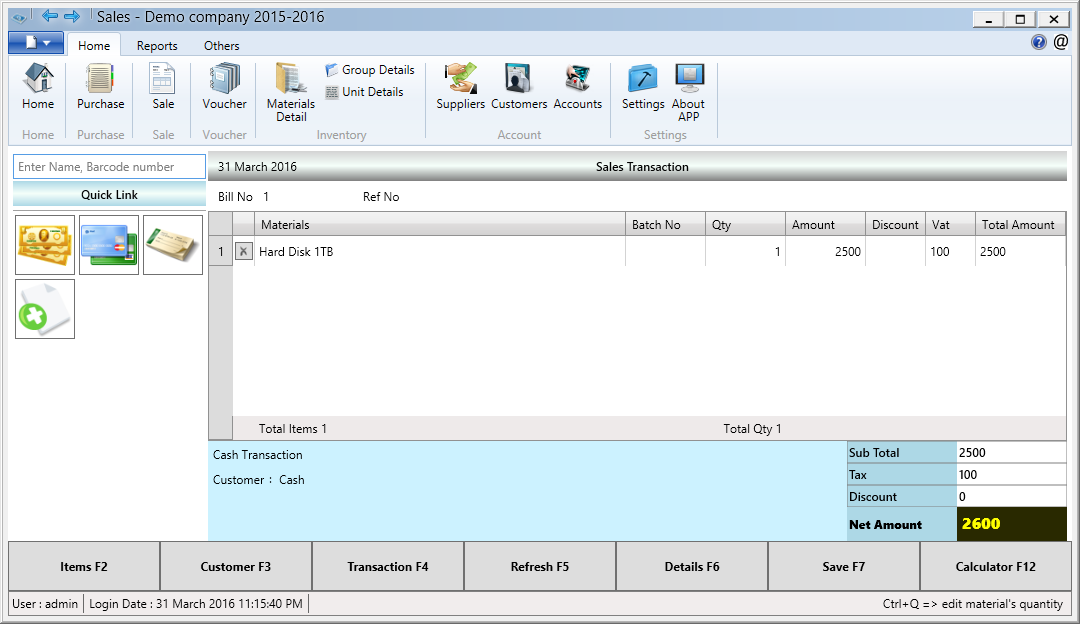
Sales Entry (Ctrl+Alt+S):
Enter Name, Barcode number field: Enter item name from this field that is being sold, entering the item name will auto populate the matching 10 names for you. You can select any name and press 'Enter' to select the item. It will add item to sales Items list. Press F2 or click on 'Items F2' button to select the item, It will open the select item dialog box support multiple filter option. If barcode scanner is enabled then just scanning the item barcode will enter the barcode number in this field and Items will be automatically added to Items list. Quantity 1 will be selected by default, It can be changed by double clicking on Qty row of the item. Based on the amount tax will be auto calculated. Tax % will be calculated based on value updated in Products details screen for each item.
Select the existing Customer by clicking on 'Customer F3’ button. Very first time this list will contains only ‘Cash’ ledger. If you want to create the Customer then you have to create the'Customer' using "Customers" tool bar button as mentioned in topic Creating Customers.
Clicking on Payment button ![]() in sales screen open the payment screen. Enter the amount received in appropriate row, If any additional details required to capture then enter details in Note column. System support taking notes for each payment mode. Note field will be useful in case required to capture the gift coupon number/denomination etc. Below is the payment mode available by default. It can be customizable using payment mode screen.
in sales screen open the payment screen. Enter the amount received in appropriate row, If any additional details required to capture then enter details in Note column. System support taking notes for each payment mode. Note field will be useful in case required to capture the gift coupon number/denomination etc. Below is the payment mode available by default. It can be customizable using payment mode screen.
[Cash Payment: Default option will be cash payment and it is used for cash and carry bill or counter cash sale. Clicking on button/image ![]() will select the cash account or select the cash transaction by selecting the ‘cash’ from ‘Customers’ button. Default selection is the Cash account. No need to select this whenever making the new sale entry. Cash account will add received bill amount to ‘cash in hand’ account ledger. Cash transaction no need to select the customer details, just select cash and generate the sales bill. If you want to assign the customer name and address for cash payment then select the cash account from "Customers" option and enter the customer details (name and address) will print the same in sales bill but transaction will be consider as counter cash sales.
will select the cash account or select the cash transaction by selecting the ‘cash’ from ‘Customers’ button. Default selection is the Cash account. No need to select this whenever making the new sale entry. Cash account will add received bill amount to ‘cash in hand’ account ledger. Cash transaction no need to select the customer details, just select cash and generate the sales bill. If you want to assign the customer name and address for cash payment then select the cash account from "Customers" option and enter the customer details (name and address) will print the same in sales bill but transaction will be consider as counter cash sales.
Credit Card Payment: If payment mode is credit card then clicking on image ![]() will set the credit card payment mode. This payment is charged against to bank ledger selected in Setting screen default section.
will set the credit card payment mode. This payment is charged against to bank ledger selected in Setting screen default section.
Cheque Payment: If payment mode through Cheque then clicking on image ![]() will set the Cheque payment mode. This payment is charged against to bank ledger selected in Setting screen's default section.]
will set the Cheque payment mode. This payment is charged against to bank ledger selected in Setting screen's default section.]
refer payment mode configuration section for more information how to add different mode of payment in quick link info.
Items F2: This screen will be used to search the Products and select the required Products for sale. You can use this screen for checking the stock status of items. stock in hand column will be visible only if 3 Items/rows available (i.e filter the existing items to display only 3 items/row to see the available stock)
Transaction F4: This screen will display last 50 transaction. If you want to modify the existing sales bill then click on 'Transaction' Button will open the transaction screen. Select the bill number which you want to edit will display the bill details in main sales screen.
Refresh F5: If you want to clear all entered details then click on Refresh button will clear the sales screen.
Details F6 : Clicking on this button will open the sales details screen as shown below.
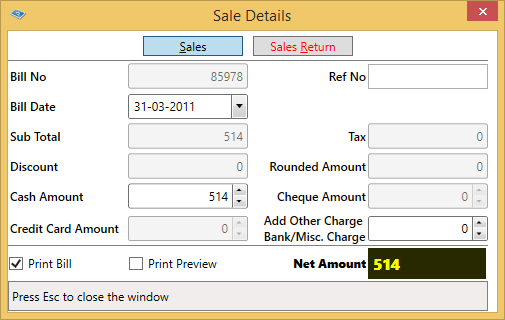
This screen will give the option for selecting the sales type : Default option is the sales type, If you want to enter the sales return select the Sales Return.
If you want to enable the part payment for customer then select the customer from Customer button will enable the Cheque Amount button. entering the amount will create the amount to customer account.
This screen will be used for part-payment if any, Ex. Existing customer want to pay some amount in cash and cheque then select the customer from "Customers" button will enable the cheque amount and credit card amount text box.
Save F7:
Save the Bill details with pressing the save to ledger button. Also it update the item stock, party ledger etc,. Bill will be generated after saving the details.
- Bill will be printed to selected printer(refer setting -> default tab -> select the bill printing printer from drop-down
- Bill format can be selected from Setting screen default section.
- Bill print preview can be enabled using Setting screen default section.
- Item name can be edited in sales screen after adding to list, edited name saved only in selected sale bill, Product name is intact, By default this feature is disabled and it can be enabled using Setting screen default section. This option is disabled for user who has only add new sales bill permission.
Sales bill Color coding :
Red color: Expired Item
Misty Rose color: Item will be expiring in next 10 days
light yellow color: Items reorder level reached

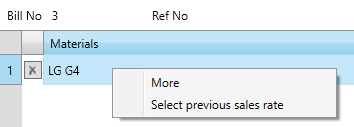
Selecting the customer's previous sales rate and discount for item : Right click on the item as shown below will open the "Select previous sales rate" menu. This menu will be activated only when customer selected. Cash transaction this menu is not available.
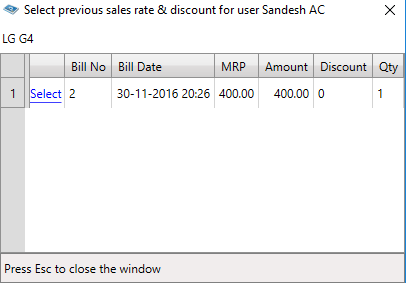
Clicking on Select previous sales rate menu will open the popup window as shown below, This window will display all the old transaction details for selected customer. selecting any row will apply the rate and discount for current transactions.
Sales Return Entry (Ctrl+Alt+S) F6:
Start the Sales return functionality goto Details screen by clicking on Detail button or Pressing F6 hot key. Click on Sales Return button will enable the sales return feature.

Sales return functionality also similar to sales entry screen. Entering the details in sales return screen will add the stock to stock in hand.
Converting sales bill to sales return bill :
If required to generate the sales return from already saved sales bill then open the sales bill in edit mode, goto Details button, click on "Sales Return" button will prompt to convert bill to sales return, Click on Yes option to convert saved sales bill to sales return format. Click on Save button to save the sales return. This feature will help to avoid re-entering all items again if some customer return the particular sales bill.
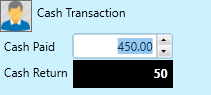
Click on button  or Shortcut key (Ctrl+Space) to activate the cash return calculation. This option helpful in POS terminal to calculate the cash return amount based on net amount.
Note:
- Clicking on Save button will save the data and bill will be printed.
- Edit the existing sales bill, click on Transactions button and select the sales bill to open sales bill in amend mode.
- Delete the sales bill, open the sales bill in edit mode will enable the "Delete sales" bill button at quick link section available at left top corner
- Configure the bill printing page size and printer goto Settings -> default -> sales ledger default setting screen.
- Enable to Sales button goto Product entry screen and click on 'Quick link' button to configure the image and name to display the sales button on Quick Link section.
- payment mode configuration screen help to add/remove the quick link payment type buttons.
- Multiple sales bill delete option provided in Transaction screen, Select multiple search result will enable button to Delete all selected rows.
- If you set the sales Qty in products details as Zero, then while adding the product in sales cursor will goto edit qty column always. Default number will set to 1 in products screen so qty editing will be manual, need to enter Ctrl+Q in case if qty edit is required.
- When adding the same product then qty will be auto increased if there is no changes in rate. Use Ctrl+Alt+I shortcut key to add to new row when add item or toggle the choice.
FAQ:
- How to amend the sales bill already saved ? : Click on Transaction button will open the window to select the old sales transaction. Search old transaction and select for amend the sales.
- How to enter the sales return? : Click on Details button and select the Sales return button to start sales return.
- How to enter credit transaction : Click on Customer button to select the customer. Click on Credit Transaction button from left side Quick Link section.
- How to track bill wise balance : Go to customer and select the "Maintain Bill wise balance" check box. henceforth all sales bill will be tracked, When customer pay the amount, go to Voucher -> Receipt, select the customer, System will asked for which bill need to deduct the received amount. Detailed report can be generated using Reports -> due bill reports.
- How to enter Item's Selling rate ? : Go to Products, enter the selling rate, To configure the multiple selling rate and tax goto Settings -> Company details -> "Manage sales price scheme and Tax" section. Refer here for more details.
- How to configure the tax : Tax for item can be configured at Product section. Refer here for more details.
- How to edit the sales bill template? : Software support editing the report using Manage Reports section
- InventoryPlus comes with 6 billing template, Select the template goto settings -> Default -> Invoice template gallery
- How to Hold the bill and continue with printing different bill when customer in queue? In Quick link section there is button called "New Sales", This will bring up new sales screen, Enter the sales and save will close the window where are already entered product details in main windows will be remain.
- How to enable selling rate shoudl be grater then Landing Cost validation while selling? Create new User and Assign the Role "sales Add new Bill" and "Enable Selling rate >= Landing Cost validation"
- How to update the rate by store manager when counter sales role user using the terminal (Sales Add new bll role user not able to edit the selling rate)? When users logged in with "Sales Add new bill" role then click on Unlock button, System will ask to enter the user name and password. Enter the admin user credential and click on validate button will give the full permisson to enter the rate and discount, Once after saving the sales or click on Refresh button will reset the admin permisson. Unlock button will be enabled for only counter sales user role only. Click on Lock button will lock the admin permisson for counter sales user if required.